There are some templates which have settings for blog also associated and some times you have may be unable to find "Page Break","Link","Undo","Redo" etc tools if you have chosen any of those templates... But don't worry follow the below steps to recover these options.

First navigate to your blog's Settings | Basic tab. Near the bottom of the page you will see a field called Select Post Editor, and from there you simply need to select Updated Editor and save your settings. That's it!

Changing these setting will benefit you:
Improved Image Handling
When you upload an image to the new post editor it will appear as a thumbnail in the image dialog box. That way, you can upload several images at once, and then add them into your post at your convenience. The thumbnails will be available until you close the post editor.
When you add an image from the dialog into your post it will be placed at the insertion point instead of at the top of the post.
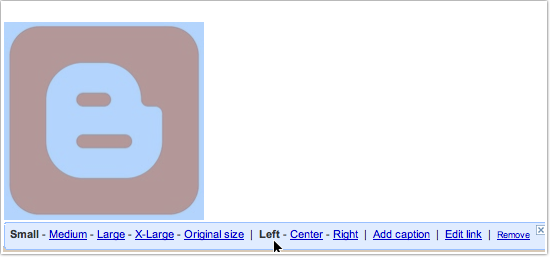
If you don’t like where an image is in your post, you can drag it around to another spot. If you drag it towards the left side of the editor it will float to the left, likewise for the right, and if you leave it in the center it will be centered. You can drag the image between paragraphs and other block elements. Unlike in the current editor, dragging in the new editor preserves the link to the full-size version of the image.
You can easily resize or remove an image with the image size “bubble.” Click on the image (Firefox 3 users may need to double-click) to bring up the bubble, and resize the image instantly. You can resize any image, including ones added by URL, but if you resize an image that was uploaded through the post editor we resample the image on our servers to keep the download size small.
Improved Raw HTML
If you use Edit HTML, especially to add tables and other advanced HTML to your posts, you should find that the new editor has a number of enhancements to make the experience less frustrating, or, dare we say it, even pleasant.
By default, the current post editor replaces any newlines in your post with
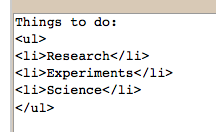
tags. This can cause problems when you want to use newlines to make table or list HTML clearer, since the inserted <br> tags will mangle the formatting significantly. The new post editor does not introduce <br> within tables, lists, scripts, styles, preformatted blocks, or objects.
Since they won’t destroy the formatting, the new post editor adds clarity newlines to the HTML that’s generated by Compose mode. For example, if you create a list in Compose mode and then look at it in Edit HTML, you’ll see that there are newlines before each of the <li> tags.
For posts made with the new editor, the blog-level “Convert line breaks” setting (from Settings | Formatting) is ignored. Instead, newline behavior is controlled by an Edit HTML setting under “Post Options,” which affects how newlines and
tags are displayed in the Edit HTML editor. This means that, unlike “Convert line breaks,” you can change newline behavior when it would be useful for a given post without affecting the display of all the other posts on your blog.
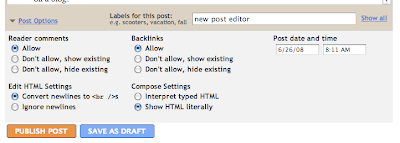
We’ve also added a Compose mode setting to let you choose what happens when HTML tags are typed in to the Compose editor. The default, “Interpret typed HTML,” matches the current post editor’s behavior: typing “bold” into the editor would look like this in your post: bold. If you change the setting to “Show HTML literally” instead, you’ll get: <b>
The Edit HTML and Compose settings, along with the choice of whether to show Edit HTML or Compose by default, are saved per-user, per-blog and are updated when you save a post. The Edit HTML setting defaults to the value of the blog’s “Convert line breaks” the first time you open the new editor.


0 comments:
Post a Comment