Pages

CPU Components

Connect the CPU Components

TechSupp247

TechSupp247

Motherboard Components

Motherboard Components

USB Protection

USB Data Protection

Wifi Printer

Wifi Printer Setup

Showing posts with label External Hard Drive. Show all posts

Tuesday, February 1, 2011

Hard Drive Boot Sector Fix


The boot sector on your hard drive is a file called the Master Boot Record (MBR for short). This sector of the hard drive is a major part of the computer's boot process, and without it, your operating system cannot successfully boot. If the MBR is corrupted by a virus or deleted through user error, you can fix it by using your operating system installation CD.

Friday, November 26, 2010

Advantages and Disadvantages of External hard disk drives

Advantages and Disadvantages of External hard disk drives
External drives are arguably the biggest growth area in data storage of recent times. They offer the possibility of a readily transportable repository for all a user’s valuable data, documents, photographs, music and movies. Alternatively they can provide a destination for a user to backup their valued files to, in case the data held on their internal storage is lost, or the internal storage fails. But are they lulling users into a false sense of security?

They are being offered with ever increasing capacity and at ever decreasing prices. Many are advertised using ‘pence per Gigabyte’ prices as a lure. However a few notes of caution arise from the recent spate of external hard drives being sent for Data Recovery.

Tuesday, November 2, 2010

Printer goes offline on reboot

On reboot computer, the printer in Windows 7 XP mode goes offline

1). In Control Panel, Printers, delete offline printers. If they wont delete, it may be because there are pending print jobs in the queue. Open the printer and Cancel the jobs..


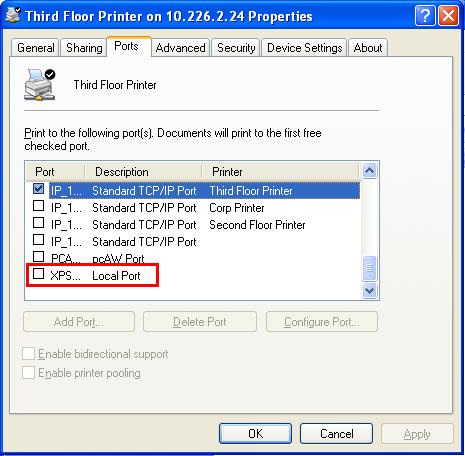
2). In Printer properties, Ports tab, delete the previously installed printers (offline status) that appear as Client Side Rendering Provider under the Description column.


To do this, highlight the port, then click on Delete Port button. Click Apply.


3). Restart your PC.
4). Now reinstall the printers as follows:
         1). Open Control panel, Printers, and click Add a printer.


         2). Click Add a local printer.
         3). Select the "Use an existing port" radio button, and select LPT1: (Printer Port). Click Next.
        4). Install the printer driver. Mine were found in the list inlcuded with Vista. Select the manufacturer and the printer. Click Next.
          5). In the next window, accept the printer name or type in a new name. Leave the "Set as default printer" box unchecked. Click Next.
5). Vista should now install the printer. A window should open saying "You've successfully added printer name.

6). DO NOT Print a test page at this time, because nothing is connected to the LPT1 port on the laptop. Just press Finish. The printer you just added should appear in the Printers window.
7). Click ONCE on the newly added printer to highlight it, then right-click and open Properties.
8). On the Ports tab, click Add Port “select Local Port, then click New Port”

9). When the Port Name window open, Enter a port name as follows: \computername\printername (replace computername with the name of your PC acting as print server, and printername with the name of your printer). Click OK.
10). You should now have a new port listed on the Ports tab of the printer Properties, but now the Description should be Local Port, instead of Client Side Rendering Provider. Click OK.

11). Now you can go to the General tab, and Print a Test Page.

Friday, October 22, 2010

Partition External Hard Drive

Partition External Hard Drive
Most of the external hard drives come with one preformatted partition ready to use. But if it didn't, or if you don't like the default setup, changing it is easy. And of course you'll want to do this before you load that disk up with data.
Start by Right clicking on My Computer and then clicking on Manage. In the resulting application window, click on Disk Management in the left hand pane. You should see something similar to this:


Related Posts Plugin for WordPress, Blogger...

Search This Blog

Followers

Twitter Delicious Facebook Digg Stumbleupon Favorites More